
Although wax seals might seem like a real lost art, this blast from the past will absolutely bring a charm of time gone by to your wedding invitations. These ornate bits of card encased in a gorgeously gilded envelope will probably be some of the most important letters that you’ll ever send out in your life, so why not add a little personalised glamour to your send outs? Whether you’re throwing a boho party, classic affair or a chic and contemporary wedding day, classic wax seals will suit you perfectly! Here are six tips for adding the right wax seal to your wedding invitations to make them feel just that extra bit of special…
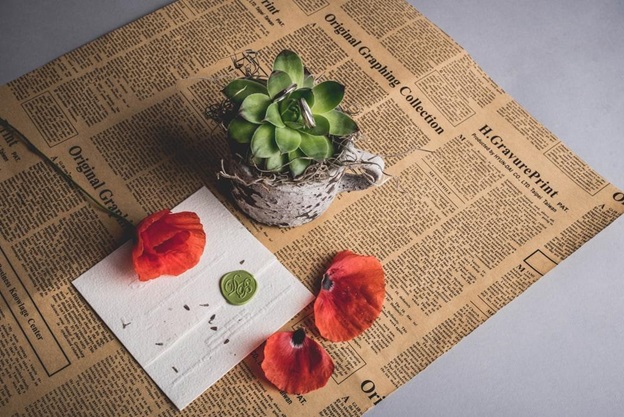
Look for a themed or personalised seal
First things first, you need to find the right seal! You can find an array of different styles that will bring their own unique effect to your wedding invitations. Look for shapes and figures that echo aspects of you and your partner’s personalities or the theme of the wedding as a whole. Alternately, you really can’t go wrong with a personalised wax seal! Get your initials, names or a custom drawing stamped on your seal and you’ll be able to treasure (and even use) it forever. This is a lovely touch and your recipients can even save their seal as a memento of the day.
Choose colours in relation to theme
Try to stay mindful when you’re shopping around for wax colours. You can mix it up if your wedding is going to be modern, bright and colourful. Traditionalist at heart? You can never go wrong with a classic cream. By choosing tones in relation to your wedding theme, you’re contributing to the day as a whole – even if it doesn’t necessarily feel like it at the time!
Get everything ready before you melt any wax
Make sure that you have absolutely everything assembled before you even think about melting any wax. Yes, it’s very exciting and you want to get going, but you cannot get carried away. Place the invite in the envelope, write the address, have all your tools (including emergency clean up essentials) gathered and slip some protective gloves on. Then you’re ready to start melting.
Take your time
All good crafters know the importance of patience, and you’re going to have to exercise a tonne of it here. Going too quickly or getting frustrated is only going to result in wasted wax and invitations. Practice on plain paper a couple of times to avoid any wax related, expensive disasters. Recruit your other half for a helping hand if you’re feeling nervous.
Add embellishments
One of the very best things about wax seals is that you can get so creative with them! For a beautifully romantic effect, consider adding dried flowers, leaves or stems to your wax. You can even opt for a little magic metallic glitter, carve in your own custom creations or marble together two colours. Add your own embellishments for a truly personal effect.
Protective packaging
Now that you’ve got a gorgeous sealed invitation on your hands, it’s important that you place it in some protective packaging to keep everything in tact on its journey to the recipient. Wrap in parchment and place in a thicker parcel envelope to keep everything in its place. You should consider springing for extra postage as it’s likely to be heavier than your run of the mill letter.
Follow these tips and you can be sure that your invitations will be breathtaking, personal and oh so stylish.